51MCN
51单片机
51里的最小的系统
晶振电路
点亮LED灯
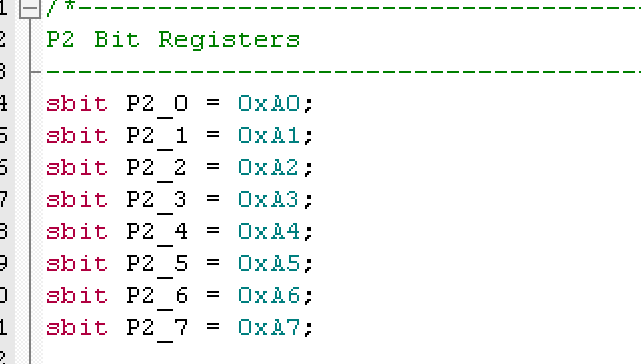
p2默认全是高电频
GPIO
是通用的输入,输出设备
点亮第一个灯的程序
1 | |
流水灯
基于位运算实现流水灯
1
2
3
4
5
6
7
8
9
10
11
12
13
14
15
16
17
18
19
20
21
22
23
24
25
26
27
28
29
30#include <reg52.h>
typedef unsigned char u8;
typedef unsigned int u16;
#define LED_PORT P2
void delay_10us(u16 ten_us)
{ //当传入1 的时候,大约延迟10us
//不精确的延时
while (ten_us--) {}
}
int main()
{
u8 i=0;
while (1)
{
LED_PORT= 0x00;
delay_10us(100000);
for (i = 0; i < 8; i++)
{
LED_PORT=~(0x01<<i);
delay_10us(50000);
}
}
return 0;
}使用库函数进行左右移动
1
2
3
4
5
6
7
8
9
10
11
12
13
14
15
16
17
18
19
20
21
22
23
24
25
26
27
28
29
30
31#include <reg52.h>
#include <intrins.h> //左移右移的头文件
typedef unsigned char u8;
typedef unsigned int u16;
#define LED_PORT P2
void delay_10us(u16 ten_us)
{ //当传入1 的时候,大约延迟10us
//不精确的延时
while (ten_us--) {}
}
int main()
{
u8 i = 0;
LED_PORT = 0x00;
delay_10us(100000);
LED_PORT = 0x01;
while (1) {
for (i = 0; i < 7; i++) {
LED_PORT = _crol_(LED_PORT, 1); //往左移
delay_10us(50000);
}
for (i = 0; i < 7; i++) {
LED_PORT = _cror_(LED_PORT, 1); //往右移
delay_10us(50000);
}
}
return 0;
}使用独立的按键控制灯的亮灭
我们控制专门的一盏灯,使用头文件REGX52.H控制每位寄存器的方式
下面是代码
1
2
3
4
5
6
7
8
9
10
11
12
13
14
15
16
17
18
19
20
21
22
23
24
25
26
27
28
29
30
31
32
33
34
35
36
37
38
39
40
41
42
43
44
45
46
47
48
49
50
51
52
53
54
55
56
57
58#include <REGX52.H>
#include <intrins.h>
typedef unsigned int u8;
#define LED_PORT P2
void Delay500ms() //@11.0592MHz
{
unsigned char data i, j, k;
_nop_();
_nop_();
i = 22;
j = 3;
k = 227;
do {
do {
while (--k)
;
} while (--j);
} while (--i);
}
void Delay250ms() //@11.0592MHz
{
unsigned char data i, j, k;
_nop_();
_nop_();
i = 11;
j = 130;
k = 111;
do
{
do
{
while (--k);
} while (--j);
} while (--i);
}
int main()
{
u8 i = 0;
P2 = 0xFF;
while (1) {
if (P3_1 == 0) {
P2_0 = 0;
} else {
P2_0 = 1;
}
}
return 0;
}跳过单次按键的周期(按一次改变一次灯)
1
2
3
4
5
6
7
8
9
10
11
12
13
14
15
16
17
18
19
20
21
22
23
24
25
26
27
28
29
30
31
32
33
34
35
36
37
38#include <REGX52.H>
#include <intrins.h>
typedef unsigned long u16;
typedef unsigned int u8;
#define LED_PORT P2
void Delay(u16 xms) //@11.0592MHz
{
unsigned char data i, j;
while (xms--) {
_nop_();
i = 2;
j = 199;
do {
while (--j)
;
} while (--i);
}
}
int main()
{
u8 i = 0;
P2 = 0x0F;
while (1) {
if (P3_1 == 0) {
Delay(20);//begin
while (P3_1 == 0);
Delay(20);//end 这个部分是一个按键检查的周期
P2 = ~P2;
}
}
return 0;
}独立按键控制灯的移位
1
2
3
4
5
6
7
8
9
10
11
12
13
14
15
16
17
18
19
20
21
22
23
24
25
26
27
28
29
30
31
32
33
34
35
36
37
38
39
40
41
42
43
44
45
46
47
48
49
50
51
52
53
54
55
56#include <REGX52.H>
#include <intrins.h>
#define LED_PORT P2
typedef unsigned long u16;
typedef unsigned int u8;
typedef unsigned char u4;
void Delay(u16 xms) //@11.0592MHz
{
unsigned char data i, j;
while (xms--) {
_nop_();
i = 2;
j = 199;
do {
while (--j)
;
} while (--i);
}
}
int main()
{
u8 i = 0;
unsigned char LEDNum;
P2 = 0x00;
Delay(500);
P2 = 0xFE;
while (1) {
//往右移
if (P3_1 == 0) {
Delay(20);
while (P3_1 == 0)
;
Delay(20);
P2 = _cror_(P2, 1);
}
//往左移
if (P3_3 == 0) {
Delay(20);
while (P3_3 == 0)
;
Delay(20);
P2 = _crol_(P2, 1);
}
}
return 0;
}总结,下面的代码是运用上面的知识写出来的按键灯光秀
1
2
3
4
5
6
7
8
9
10
11
12
13
14
15
16
17
18
19
20
21
22
23
24
25
26
27
28
29
30
31
32
33
34
35
36
37
38
39
40
41
42
43
44
45
46
47
48
49
50
51
52
53
54
55
56
57
58
59
60
61
62
63
64
65
66
67
68
69
70
71
72
73
74
75
76
77
78
79
80
81
82
83
84
85
86
87
88
89#include <REGX52.H>
#include <intrins.h>
#define LED_PORT P2
typedef unsigned long u16;
typedef unsigned int u8;
typedef unsigned char u4;
void Delay(u16 xms) //@11.0592MHz
{
unsigned char data i, j;
while (xms--) {
_nop_();
i = 2;
j = 199;
do {
while (--j)
;
} while (--i);
}
}
int main()
{
u8 i = 0;
unsigned char LEDNum;
P2 = 0x00;
Delay(500);
P2 = 0xFE;
while (1) {
if (P3_1 == 0) {
Delay(20);
while (P3_1 == 0)
;
Delay(20);
P2 = _cror_(P2, 1);
}
if (P3_3 == 0) {
Delay(20);
while (P3_3 == 0)
;
Delay(20);
P2 = _crol_(P2, 1);
}
if (P3_0 == 0) {
Delay(20);
while (P3_0 == 0)
;
Delay(20);
for (i = 0; i < 7; i++) {
LED_PORT = _crol_(LED_PORT, 1); //往左移
Delay(100);
}
for (i = 0; i < 7; i++) {
LED_PORT = _cror_(LED_PORT, 1); //往右移
Delay(100);
}
P3_0 = 1;
}
if (P3_2 == 0) {
Delay(20);
while (P3_2 == 0)
;
Delay(20);
for (i = 0; i < 3; i++) {
LED_PORT = _crol_(LED_PORT, 2); //往左移
Delay(100);
}
for (i = 0; i < 3; i++) {
LED_PORT = _cror_(LED_PORT, 2); //往右移
Delay(100);
}
P3_2 = 1;
}
}
return 0;
}
数码管
静态数码管
点亮一个数码管的数字
1
2
3
4
5
6
7
8
9
10
11
12
13
14
15
16
17
18
19
20
21
22
23
24
25
26
27
28
29
30
31
32
33
34
35
36
37
38
39
40
41
42
43
44
45
46
47
48
49
50
51
52
53
54
55
56
57
58
59
60
61
62
63
64
65
66
67
68
69
70
71
72
73
74
75
76
77
78
79
80
81
82
83
84
85
86
87
88
89
90
91
92
93
94
95
96
97
98#include <REGX52.H>
#include <intrins.h>
typedef unsigned long u16;
typedef unsigned int u8;
typedef unsigned char u4;
//在led打印的数组
u4 printLedNum[10] = {0x3F, 0x30, 0x5B, 0x4F, 0x66, 0x6D, 0x7D,0x07,0x7F,0x6F};
void Delay(u16 xms) //@11.0592MHz
{
unsigned char data i, j;
while (xms--) {
_nop_();
i = 2;
j = 199;
do {
while (--j)
;
} while (--i);
}
}
void printSix()
{
P2_2 = 1;
P2_3 = 0;
P2_4 = 1;
P0 = 0x7D;
}
void DigitalTube(u4 LEDNum, u4 num)
{
switch (LEDNum) {
case 1:
P2_2 = 1;
P2_3 = 1;
P2_4 = 1;
break;
case 2:
P2_2 = 0;
P2_3 = 1;
P2_4 = 1;
break;
case 3:
P2_2 = 1;
P2_3 = 0;
P2_4 = 1;
break;
case 4:
P2_2 = 0;
P2_3 = 0;
P2_4 = 1;
break;
case 5:
P2_2 = 1;
P2_3 = 1;
P2_4 = 0;
break;
case 6:
P2_2 = 0;
P2_3 = 1;
P2_4 = 0;
break;
case 7:
P2_2 = 1;
P2_3 = 0;
P2_4 = 0;
break;
case 8:
P2_2 = 0;
P2_3 = 0;
P2_4 = 0;
break;
default:
break;
}
P0 = printLedNum[num];
//由于led电子管的使用饭方式是 位选 段选 位选 段选,每一个(位选 段选)是一个集合,控制一个LED
//但是由于运行效率极高,所以上阶段段选会进入到下一阶段的位选当中,所以我们需要人为的进行消影
Delay(1);//这里延迟的原因是因为,直接归零的话显示的效果就会不明显
P0=0x00;
}
int main()
{
while (1) {
DigitalTube(1, 1);
DigitalTube(3, 3);
DigitalTube(5, 5);
DigitalTube(7, 7);
}
return 0;
}
51MCN
https://tsy244.github.io/2023/08/10/嵌入式/51MCN/